
商品一覧をスライダー(カルーセル)表示する方法を紹介します。
EC-CUBEには「Slickスライダー」というjQueryプラグインが使われており、これを利用することで複雑なコードを書かなくても(管理画面でTwigテンプレートを修正するのみで)スライダー表示を実装できます。
トップページのメイン画像のような表示を、商品一覧に応用するイメージです。
本記事では以下ブロックの作り方(コード)を共有します。
デバッグモードを設定しておくと、エラーが起きたときに詳細情報が表示されるようになります。
エラー箇所を探しやすくなるので、開発前に設定しておくのをオススメします。
デバッグモードの設定方法については 以下記事 で解説しています。
カスタマイズ後は、デバッグモードの解除を忘れないように。
スライダー実装までの手順
本記事では、以前に作成した新着商品ブロック(IDの大きい順に商品を表示)を修正し、スライダー表示に変更する手順を紹介します。

上記記事をベースに作成したControllerファイル および 新着商品ブロックのTwigテンプレート はこちら
トップページのControllerファイル(以下)をCustomize/Controllerに保存し、既存のControllerを上書きします。
<?php

/*
 * This file is part of EC-CUBE
 *
 * Copyright(c) EC-CUBE CO.,LTD. All Rights Reserved.
 *
 * http://www.ec-cube.co.jp/
 *
 * For the full copyright and license information, please view the LICENSE
 * file that was distributed with this source code.
 */

namespace Customize\Controller;

use Sensio\Bundle\FrameworkExtraBundle\Configuration\Template;
use Symfony\Component\Routing\Annotation\Route;
use Eccube\Controller\AbstractController;
use Eccube\Repository\ProductRepository;  // データベースのdtb_Productテーブルから情報を取得するためのリポジトリ。

class TopController extends AbstractController
{
    // ProductRepositoryのプロパティを宣言。
    /**
     * @var ProductRepository
     */
    protected $productRepository;

    // コンストラクタメソッド。このクラスがインスタンス化されるときに自動的に呼び出される。
    // ProductRepositoryを引数として受け取り、それをクラスのプロパティに格納する。
    /**
     * @param ProductRepository $productRepository
     */
    public function __construct(ProductRepository $productRepository) {
        $this->productRepository = $productRepository;
    }

    /**
     * @Route("/", name="homepage", methods={"GET"})
     * @Template("index.twig")
     */
    public function index()
    {
      // ProductRepositoryを使って、IDの大きい順(降順)に12件取得。
      $products = $this->productRepository->findby([], ['id' => 'DESC'], 12);

      // 取得した商品データをTwigテンプレートに渡す。
      return [
          'Products' => $products,
      ];
    }
}
前回の記事では、トップページのスペースの関係上、IDの大きな商品は3件のみ取得していました。
今回はスライダー表示のため、取得件数を12件に変更します。
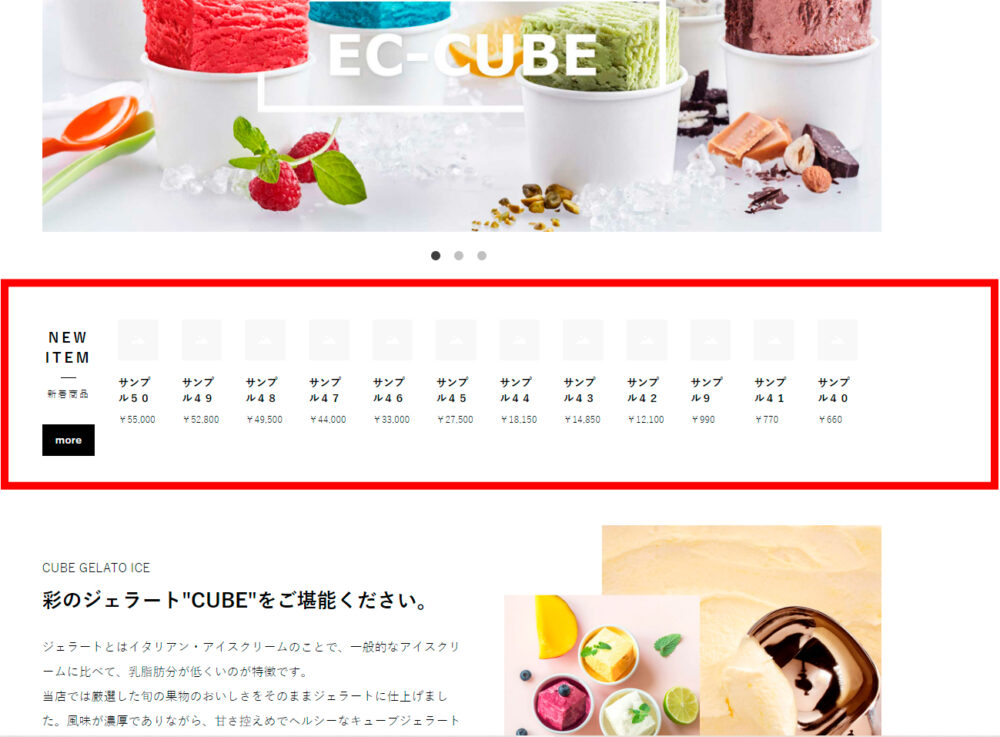
以下コードを記載した新着商品ブロックを作成します。
商品数が増えたため、今回はfor文を使った表記に変更しました。(for文については こちら)
<div class="ec-role">
    <div class="ec-newItemRole">
        <div class="ec-newItemRole__list">
            <div class="ec-newItemRole__listItem">
                <div class="ec-newItemRole__listItemHeading ec-secHeading--tandem">
                    <span class="ec-secHeading__en">{{ 'NEW ITEM'|trans }}</span>
                    <span class="ec-secHeading__line"></span>
                    <span class="ec-secHeading__ja">{{ '新着商品'|trans }}</span>
                    <a class="ec-inlineBtn--top" href="{{ url('product_list') }}">{{ 'more'|trans }}</a>
                </div>
            </div>
            {% for Product in Products %}
                <div class="ec-newItemRole__listItem">
                    <a href="{{ url('product_detail', {'id': Product.id}) }}">
                        <img src="{{ asset(Product.main_list_image|no_image_product, 'save_image') }}" alt="{{ Product.name }}">
                        <p class="ec-newItemRole__listItemTitle">{{ Product.name }}</p>
                        <p class="ec-newItemRole__listItemPrice">
                            {% if Product.hasProductClass %}
                                {% if Product.getPrice02Min == Product.getPrice02Max %}
                                    {{ Product.getPrice02IncTaxMin|price }}
                                {% else %}
                                    {{ Product.getPrice02IncTaxMin|price }} ~ {{ Product.getPrice02IncTaxMax|price }}
                                {% endif %}
                            {% else %}
                                {{ Product.getPrice02IncTaxMin|price }}
                            {% endif %}
                        </p>
                    </a>
                </div>
            {% endfor %}
        </div>
    </div>
</div>
トップページのレイアウトに上記ブロックを挿入すると、以下のような表示になると思います。
Slickスライダーを利用するためのコードを追記
新着商品ブロック(new_item.twig)を開き、Slickスライダーの設定を行います。
ます、EC-CUBEのトップページでSlickスライダーを使う箇所に、以下のようなHTMLコードを記述します。
<div class="ec-sliderRole">
    <div class="custom-carousel">
        {% for Product in Products %}
            <div class="ec-newItemRole__listItem item slick-slide">
            {# 省略 #}
            </div>
        {% endfor %}
    </div>
</div>- 全体を “ec-sliderRole” クラスで囲う。
- さらに “custom-carousel” クラスで囲う。(ここのクラス名は何でもOK)
- スライダー表示させる個々の要素に “item” と “slick-slide” クラスを追加
以下は修正後の新着商品ブロックのコードです。
<div class="ec-role">
    <div class="ec-newItemRole">
        <div class="ec-newItemRole__list">
            <div class="ec-newItemRole__listItem">
                <div class="ec-newItemRole__listItemHeading ec-secHeading--tandem">
                    <span class="ec-secHeading__en">{{ 'NEW ITEM'|trans }}</span>
                    <span class="ec-secHeading__line"></span>
                    <span class="ec-secHeading__ja">{{ '新着商品'|trans }}</span>
                    <a class="ec-inlineBtn--top" href="{{ url('product_list') }}">{{ 'more'|trans }}</a>
                </div>
            </div>
            <div class="ec-sliderRole">
                <div class="custom-carousel">
                    {% for Product in Products %}
                        <div class="ec-newItemRole__listItem item slick-slide">
                            <a href="{{ url('product_detail', {'id': Product.id}) }}">
                                <img src="{{ asset(Product.main_list_image|no_image_product, 'save_image') }}" alt="{{ Product.name }}">
                                <p class="ec-newItemRole__listItemTitle">{{ Product.name }}</p>
                                <p class="ec-newItemRole__listItemPrice">
                                    {% if Product.hasProductClass %}
                                        {% if Product.getPrice02Min == Product.getPrice02Max %}
                                            {{ Product.getPrice02IncTaxMin|price }}
                                        {% else %}
                                            {{ Product.getPrice02IncTaxMin|price }} ~ {{ Product.getPrice02IncTaxMax|price }}
                                        {% endif %}
                                    {% else %}
                                        {{ Product.getPrice02IncTaxMin|price }}
                                    {% endif %}
                                </p>
                            </a>
                        </div>
                    {% endfor %}
                </div>
            </div>
        </div>
    </div>
</div>Slickスライダーを実装するためのJQueryを追記
次に、新着商品ブロックの上方に以下のJQueryを記述します。
4行目の引数には、STEP2で設定したクラス名を記述します。
{% block javascript %}
<script type="text/javascript">
    $(document).ready(function(){
    $('.custom-carousel').slick({
        // ここに各種オプションを記載
    });
    });
</script>
{% endblock %}
Slickスライダーでは、一度に表示させる要素数や自動スクロールのオン・オフなど、各種オプションを設定できます。
- slidesToShow
-
一度に表示するスライド数を指定
- slidesToScroll
-
一度のスクロールで移動するスライド数を指定
- autoplay
-
自動スクロールさせるかどうかを設定
- autoplaySpeed
-
自動スクロールの速度(ミリ秒単位)を指定
- arrows
-
ナビゲーション矢印の表示/非表示を設定
- dots
-
ドットナビゲーションの表示/非表示を設定
- centerMode
-
アクティブなスライドをセンターに配置
- centerPadding
-
センターモード時のサイドのパディングを設定
- responsive
-
ブレークポイント(画面幅)ごとの設定を指定
今回は以下のようなオプションを設定しました。
- 一度に表示するスライド(商品)は4点(
slidesToShow: 4) - 一度のスクロールで移動するスライド(商品)は4点(
slidesToScroll: 4) - 自動スクロールさせる(
autoplay: true) - 自動スクロールは2秒(2,000ミリ秒)ごとに行う(
autoplaySpeed: 2000) - スライダーの下方にドットナビゲーションを表示(
dots: true)
{% block javascript %}
<script type="text/javascript">
$(document).ready(function(){
$('.custom-carousel').slick({
slidesToShow: 4,
slidesToScroll: 4,
autoplay: true,
autoplaySpeed: 2000,
dots: true,
});
});
</script>
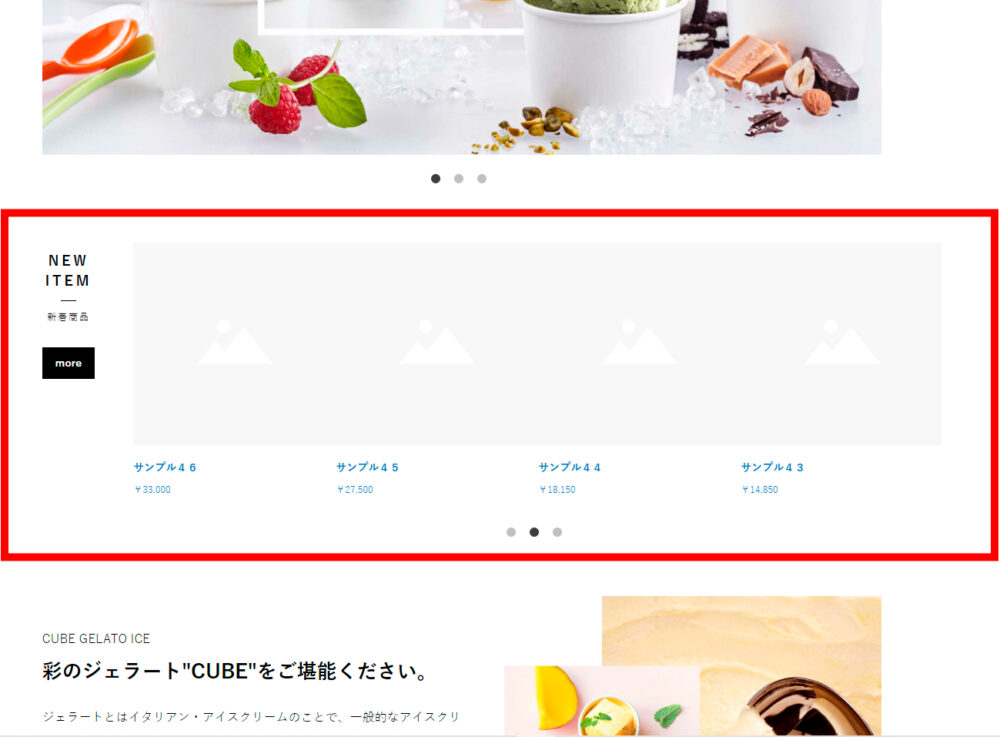
{% endblock %}以上で実装完了です。
コード全体は以下に纏めています。
デザインなどは、CSSやSlickスライダーのオプションなどを適宜設定してください。

【実装コード】新着商品を4個ずつスライダー表示
全体のコードは以下の通りです。
以下コードを記載した新規ブロックを作成し、トップページに表示させればOKです。
(トップページのControllerも修正しておくこと)
{% block javascript %}
<script type="text/javascript">
    $(document).ready(function(){
    $('.custom-carousel').slick({
        slidesToShow: 4,
        slidesToScroll: 4,
        autoplay: true,
        autoplaySpeed: 2000,
        dots: true,
    });
    });
</script>
{% endblock %}

<div class="ec-role">
    <div class="ec-newItemRole">
        <div class="ec-newItemRole__list">
            <div class="ec-newItemRole__listItem">
                <div class="ec-newItemRole__listItemHeading ec-secHeading--tandem">
                    <span class="ec-secHeading__en">{{ 'NEW ITEM'|trans }}</span>
                    <span class="ec-secHeading__line"></span>
                    <span class="ec-secHeading__ja">{{ '新着商品'|trans }}</span>
                    <a class="ec-inlineBtn--top" href="{{ url('product_list') }}">{{ 'more'|trans }}</a>
                </div>
            </div>
            <div class="ec-sliderRole">
                <div class="custom-carousel">
                    {% for Product in Products %}
                        <div class="ec-newItemRole__listItem item slick-slide">
                            <a href="{{ url('product_detail', {'id': Product.id}) }}">
                                <img src="{{ asset(Product.main_list_image|no_image_product, 'save_image') }}" alt="{{ Product.name }}">
                                <p class="ec-newItemRole__listItemTitle">{{ Product.name }}</p>
                                <p class="ec-newItemRole__listItemPrice">
                                    {% if Product.hasProductClass %}
                                        {% if Product.getPrice02Min == Product.getPrice02Max %}
                                            {{ Product.getPrice02IncTaxMin|price }}
                                        {% else %}
                                            {{ Product.getPrice02IncTaxMin|price }} ~ {{ Product.getPrice02IncTaxMax|price }}
                                        {% endif %}
                                    {% else %}
                                        {{ Product.getPrice02IncTaxMin|price }}
                                    {% endif %}
                                </p>
                            </a>
                        </div>
                    {% endfor %}
                </div>
            </div>
        </div>
    </div>
</div>
実装後、以下のような表示になっていればOKです。