
本記事では、以下のように商品一覧ページ右上に表示される並び順(ソート順)の種類を増やすカスタマイズについて紹介します。
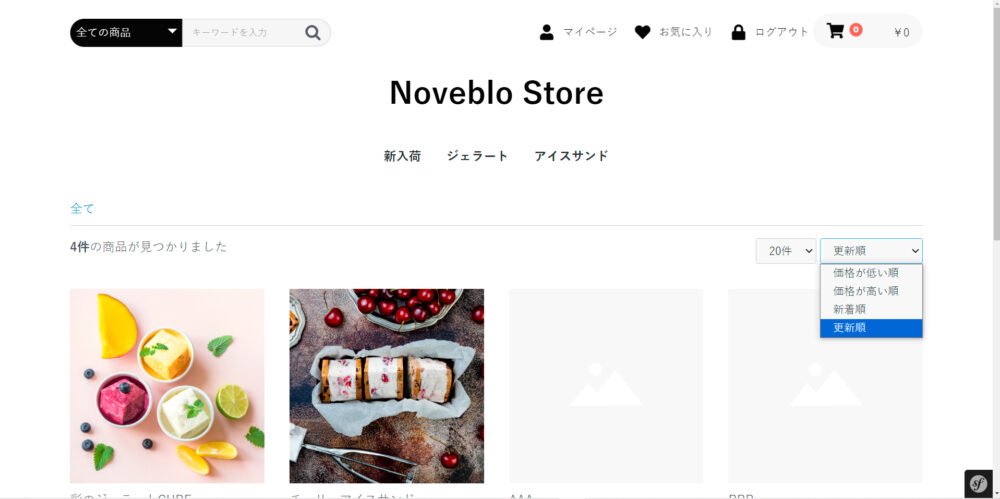
更新順を選択すると、更新日(update_date)が新しい順に商品が並び替えられる。

デバッグモードを設定しておくと、エラーが起きたときに詳細情報が表示されるようになります。
エラー箇所を探しやすくなるので、開発前に設定しておくのをオススメします。
デバッグモードの設定方法については 以下記事 で解説しています。
カスタマイズ後は、デバッグモードの解除を忘れないように。
マスタデータ管理にて、並び替え(ソート)オプションを追加
まず、EC-CUBE管理画面 → システム設定 → マスタデータ管理より、新しい並び替えオプションを追加します。
本記事では例として、4つ目に「更新順」というオプションを追加してみます。
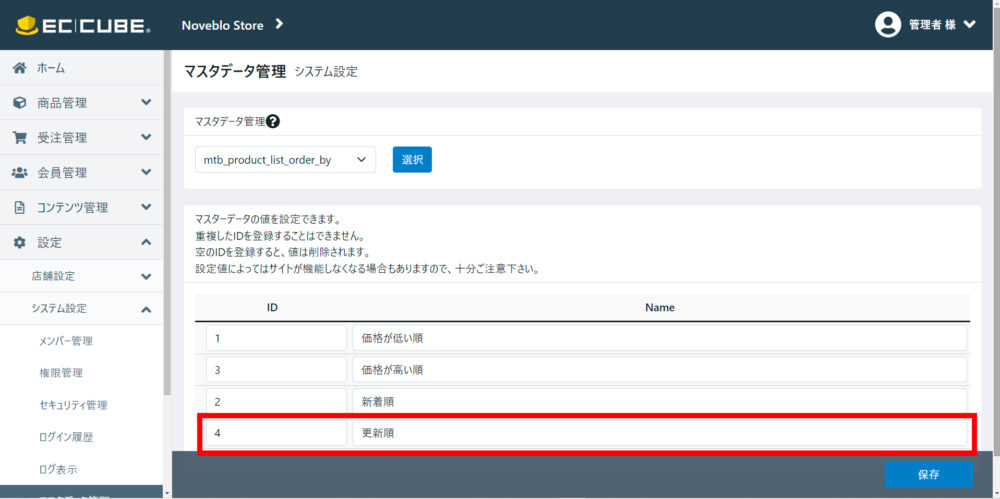
- プルダウンより「mtb_product_list_order_by」を選択します。
- 既存の並べ替えオプション「価格が低い順」「価格が高い順」「新着順」が表示されます。
- 新しいオプションを追加するには、4行目(最後の行)にIDとNameを記入して保存します。
これだけで、商品一覧ページのプルダウンで「更新順」が選択できるようになります。
(まだ並び替えのプログラムを組んでいないので、選択しても何も起きません。)
リポジトリ(Repository)を新規作成し、新しい並べ替え処理を追加
続いて、「更新順」を選んだときの並べ替え処理を追加したリポジトリを作成します。
既存の並べ替え処理を記述したリポジトリは「src/Eccube/Repository/ProductRepository.php」で、こちらに新しい処理を追加することもできます。が、既存のファイルを弄るのは推奨されていません。そこで本記事では、Customizeディレクトリに既存のRepositoryの一部をコピーし、そちらに処理を追加することで実装します。
以下は、既存のRepositoryからGetQueryBuilderBySearchData($searchData)メソッド部分をコピーし、「更新順」の処理を追加&名前空間やuseステートメント、クラス名などの必要箇所を修正して作成したカスタムリポジトリです。
<?php

namespace Customize\Repository;

use Eccube\Repository\ProductRepository;
use Eccube\Util\StringUtil;
use Eccube\Repository\QueryKey;

class CustomProductRepository extends ProductRepository
{
    /**
     * get query builder.
     *
     * @param array{
     *         category_id?:Category,
     *         name?:string,
     *         pageno?:string,
     *         disp_number?:ProductListMax,
     *         orderby?:ProductListOrderBy
     *     } $searchData
     *
     * @return \Doctrine\ORM\QueryBuilder
     */
    public function customGetQueryBuilderBySearchData($searchData)
    {
        $qb = $this->createQueryBuilder('p')
            ->andWhere('p.Status = 1');

        // 略

        // Order By
        // 価格低い順
        $config = $this->eccubeConfig;
        if (!empty($searchData['orderby']) && $searchData['orderby']->getId() == $config['eccube_product_order_price_lower']) {

        // 略

        // 価格高い順
        } elseif (!empty($searchData['orderby']) && $searchData['orderby']->getId() == $config['eccube_product_order_price_higher']) {

        // 略

        // 新着順
        } elseif (!empty($searchData['orderby']) && $searchData['orderby']->getId() == $config['eccube_product_order_newer']) {

        // 略

        // 更新順
        } elseif (!empty($searchData['orderby']) && $searchData['orderby']->getId() == 4) {
            if ($this->getEntityManager()->getFilters()->isEnabled('option_nostock_hidden') == true) {
                $qb->innerJoin('p.ProductClasses', 'pc');
                $qb->andWhere('pc.visible = true');
            }
            $qb->orderBy('p.update_date', 'DESC');
            $qb->addOrderBy('p.id', 'DESC');
        } else {

        // 略

        }

        return $this->queries->customize(QueryKey::PRODUCT_SEARCH, $qb, $searchData);
    }
}
コード修正&追記部分はこちら
- 名前空間
-
namespace Customize\Repository;このリポジトリを保存するディレクトリ「Customize/Repository」を記述します。
- useステートメント
-
use Eccube\Repository\ProductRepository; use Eccube\Util\StringUtil; use Eccube\Repository\QueryKey;- このリポジトリの親となる
ProductRepositoryを記述します。 - このリポジトリで利用するクラス「StringUtil」「QueryKey」を記述します。
- このリポジトリの親となる
- 新しいクラスの設定
-
class CustomProductRepository extends ProductRepository
{
}
クラス名はリポジトリと同じ名前にし、
extendsキーワードで親リポジトリProductRepositoryを引き継ぎます。 - 新しいメソッド名 & 新しい並び替え処理の追加
-
public function customGetQueryBuilderBySearchData($searchData)
    {

    // 略

    // 更新順
    } elseif (!empty($searchData['orderby']) && $searchData['orderby']->getId() == 4) {
        if ($this->getEntityManager()->getFilters()->isEnabled('option_nostock_hidden') == true) {
            $qb->innerJoin('p.ProductClasses', 'pc');
            $qb->andWhere('pc.visible = true');
        }
        $qb->orderBy('p.update_date', 'DESC');
        $qb->addOrderBy('p.id', 'DESC');
    } else {

    // 略
新着順の並び替え処理の次に、今回追加した「更新順」の処理を記述します。
$qb->orderBy('p.update_date', 'DESC')とすることで、update_date(更新日)が降順(新しい順)に並び替えられます。
コントローラ(Controller)を新規作成し、STEP2で作成したリポジトリ(Repository)のメソッドを実行
最後に、STEP2で作成したリポジトリ(Repository)のメソッドcustomGetQueryBuilderBySearchData($searchData)を利用したコントローラ(Controller)を「Customize/Controller」ディレクトリに作成します。
以下は、既存のコントローラ「src/Eccube/Controller/ProductController.php」をコピーし、商品一覧画面/products/list部分を修正して作成したカスタムコントローラです。
<?php

/*
 * This file is part of EC-CUBE
 *
 * Copyright(c) EC-CUBE CO.,LTD. All Rights Reserved.
 *
 * http://www.ec-cube.co.jp/
 *
 * For the full copyright and license information, please view the LICENSE
 * file that was distributed with this source code.
 */

namespace Customize\Controller;

use Eccube\Entity\BaseInfo;

// 略

use Eccube\Controller\AbstractController;
use Customize\Repository\CustomProductRepository;

class CustomProductController extends AbstractController
{
    /**
     * @var PurchaseFlow
     */
    protected $purchaseFlow;

    // 略

    /**
     * @var CustomProductRepository
     */
    protected $customProductRepository;

    private $title = '';

    /**
     * ProductController constructor.
     *
     * @param PurchaseFlow $cartPurchaseFlow

    // 略

     * @param CustomProductRepository $customProductRepository
     */
    public function __construct(
        PurchaseFlow $cartPurchaseFlow,

        // 略

        CustomProductRepository $customProductRepository
    ) {
        $this->purchaseFlow = $cartPurchaseFlow;

        // 略

        $this->customProductRepository = $customProductRepository;
    }

    /**
     * 商品一覧画面.
     *
     * @Route("/products/list", name="product_list", methods={"GET"})
     * @Template("Product/list.twig")
     */
    public function index(Request $request, PaginatorInterface $paginator)
    {
        // 略

        // paginator
        $searchData = $searchForm->getData();
        $qb = $this->customProductRepository->customGetQueryBuilderBySearchData($searchData);

        // 略
    }

  // 略

}
コード修正&追記部分はこちら
- 名前空間
-
namespace Customize\Controller;このコントローラを保存するディレクトリ「Customize/Controller」を記述します。
- useステートメント
-
use Eccube\Controller\AbstractController;
use Customize\Repository\CustomProductRepository;
ベースのコントローラと、STEP2で作成した「CustomProductRepository」を宣言します。
- 新しいクラスの設定
-
class CustomProductController extends AbstractController
{
}
クラス名はコントローラと同じ名前にします。
- 追加定数の宣言&コンストラクターの追加
-
/**
 * @var CustomProductRepository
 */
protected $customProductRepository;

/**
 * ProductController constructor.
 *
 * @param CustomProductRepository $customProductRepository
 */

public function __construct(
    CustomProductRepository $customProductRepository
) {
    $this->customProductRepository = $customProductRepository;
}
リポジトリを使うための準備。詳細は以下記事にて。
- 並び替え処理を追加したリポジトリのメソッドを呼び出す
-
$qb = $this->customProductRepository->customGetQueryBuilderBySearchData($searchData);ProductRepository->getQueryBuilderBySearchData($searchData)となっている箇所を、新しいリポジトリとメソッドに修正します。
作成した「CustomProductRepository.php」と「CustomProductController.php」をCustomizeディレクトリにアップすれば、カスタマイズ完了です。念のため、キャッシュを削除してから実装できているか確認してみましょう。